What Is Roof Flashing?

A single missing piece of metal, sometimes no wider than a few inches, can send thousands of dollars in water damage cascading through your ceilings, walls, and insulation. Most homeowners never think about roof flashing until a brown stain appears overhead or mold creeps into an attic corner.
Whether you’re dealing with an active leak or just want to stay ahead of problems, find out where roof flashing goes and how to spot signs of infiltration so you know exactly what to look for and when to act.
Roof flashing is thin sheet metal installed at joints, transitions, and penetrations across your roof to direct water away from vulnerable areas. Shingles handle broad, flat surfaces well, but anywhere the roof plane meets a wall, chimney, skylight, vent, or valley creates a gap that shingles alone can’t seal. Flashing bridges those gaps.
Without it, water follows gravity into the path of least resistance: under shingles, behind siding, into wall cavities. Even a small gap in flashing can allow moisture intrusion that rots roof decking and framing over months.
Where Flashing Is Required: Chimneys, Valleys, Vents, and Wall Junctions
You’ll find flashing at every point where your roof changes direction or meets another structure. The most common locations include chimney bases, skylight perimeters, roof valleys, wall-to-roof junctions, vent pipe bases, drip edges along eaves and rakes, dormer transitions, and related roof components.
Types of Roof Flashing
Not all flashing serves the same purpose. Each type is shaped for a specific location, and using the wrong one, or skipping one entirely, creates a weak point. Here’s how the most common types compare.
| Flashing Type | Location | Shape / Design | Key Function |
|---|---|---|---|
| Step flashing | Where roof meets a sidewall | L-shaped pieces layered with shingles | Channels water away from wall junctions |
| Counter flashing | Over step flashing on masonry | Metal embedded in mortar joints | Covers top edge of step flashing |
| Valley flashing | Roof valleys where two slopes meet | Wide, W-shaped or flat sheet | Handles high-volume water flow |
| Drip edge | Eaves and rakes | L-shaped continuous strip | Directs water into gutters |
| Chimney flashing | Chimney base perimeter | Multi-piece system (base, step, counter, cricket) | Seals the roof’s largest penetration |
| Skylight flashing | Skylight curb perimeter | Manufacturer-specific kit or custom-bent | Prevents leaks around skylight frame |
| Pipe boot / vent flashing | Plumbing vent pipes | Cone-shaped rubber or metal collar | Seals around cylindrical penetrations |
| Kickout flashing | Where roof edge meets a sidewall above | Small deflector piece | Diverts water into gutter instead of wall |
Step Flashing
Step flashing gets its name from the stair-step pattern it creates along a wall-to-roof junction. Each L-shaped piece overlaps the one below it, woven between shingle courses so water always sheds outward. When installers take shortcuts here, such as using a single continuous piece of bent metal instead of individual stepped pieces, water eventually works behind the metal and into the wall.
A common error is relying on sealant (caulk or roofing cement) as a substitute for proper metal overlap. Sealant degrades in UV exposure and temperature cycling within a few years. The metal overlap itself should be doing the waterproofing work. Sealant is a supplement, never a primary defense.
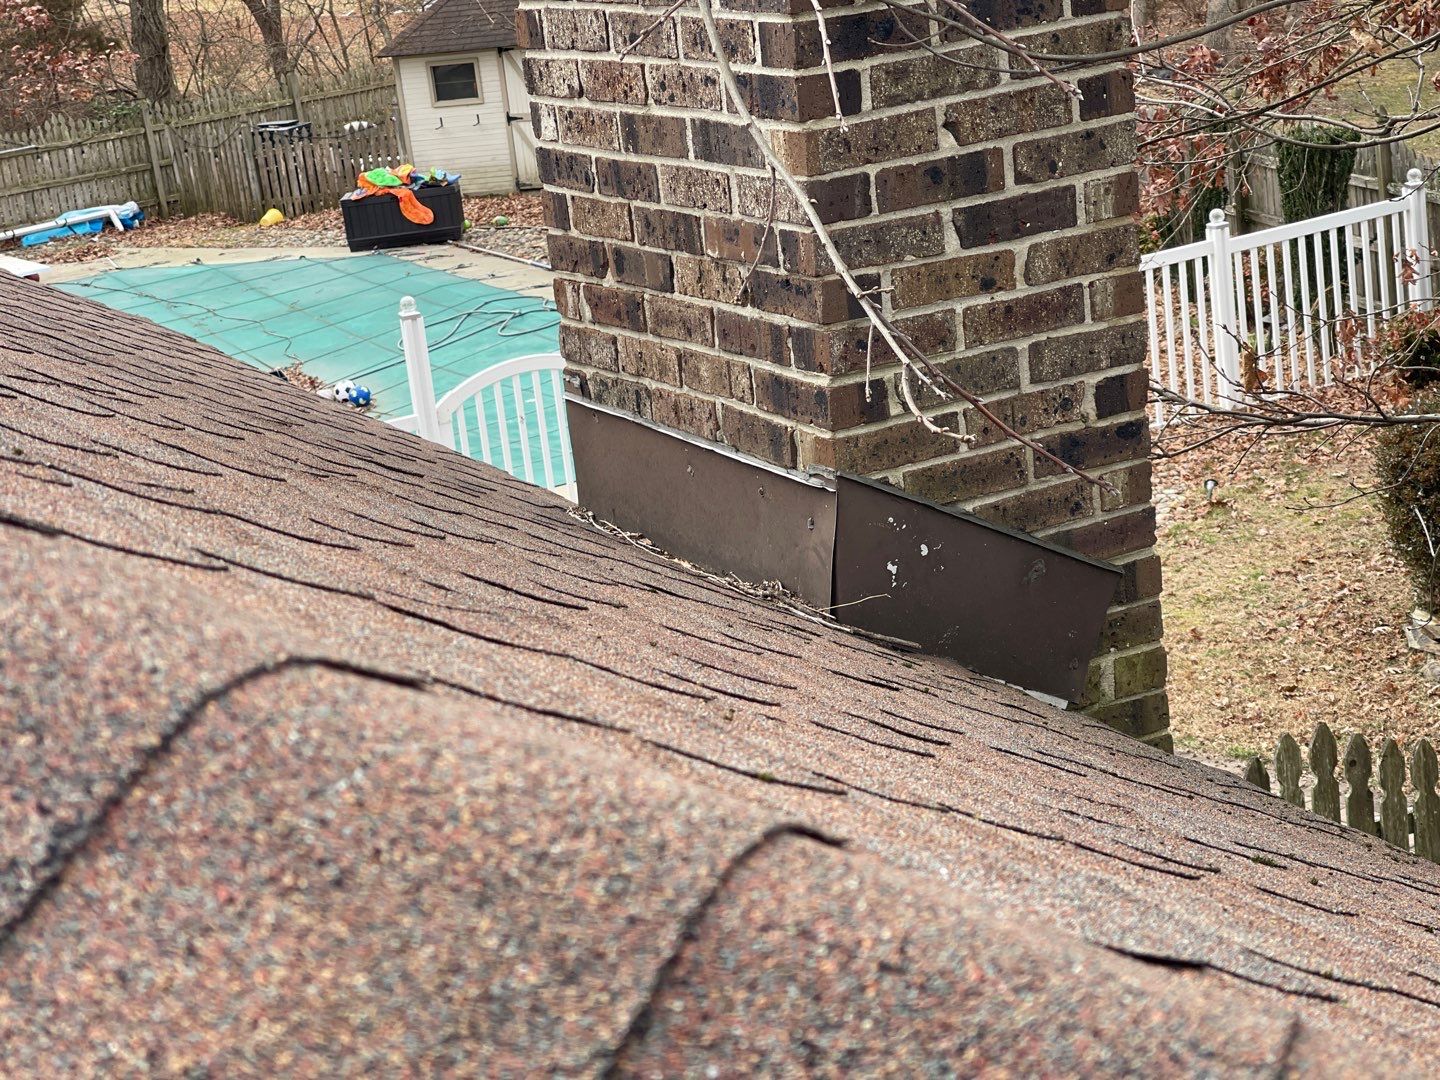
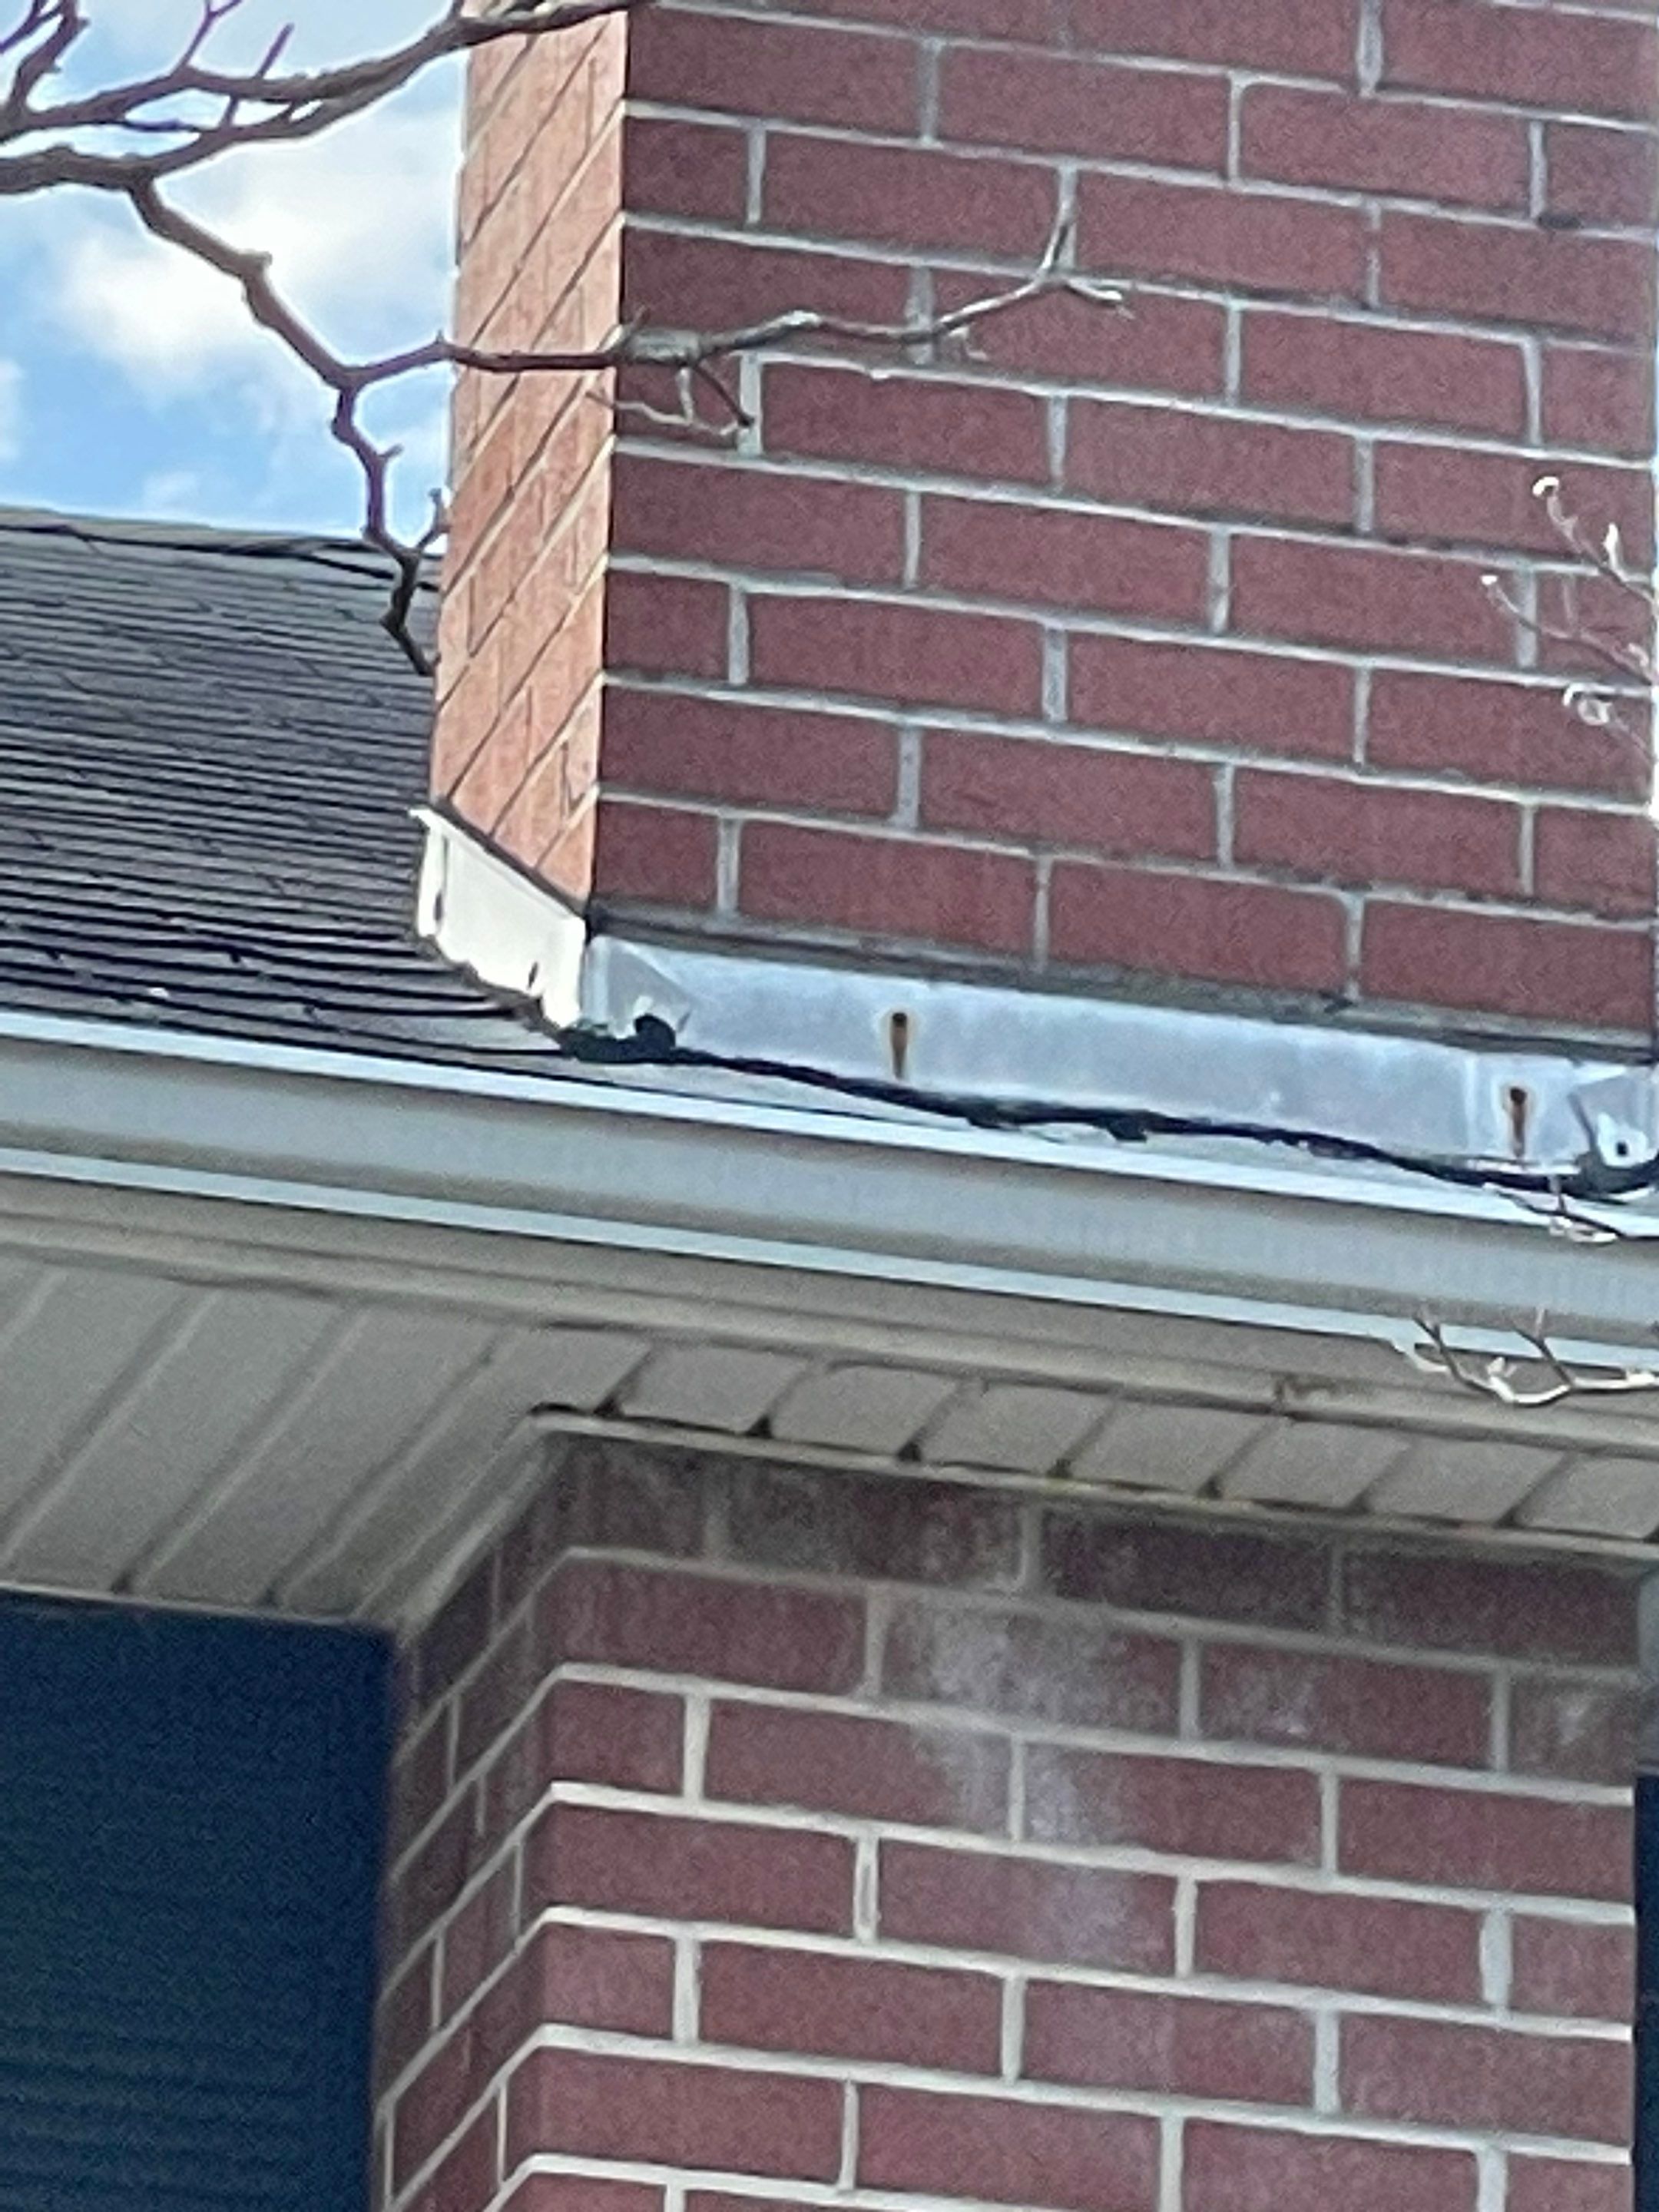
Chimney Flashing and Counterflashing
Chimneys present the biggest challenge because they create a large rectangular penetration. The flashing system involves base flashing at the front (apron), step flashing along each side, a cricket (or saddle) behind the chimney to divert water, and counter flashing that tucks into masonry mortar joints to cover the top edge of everything below.
Failure usually starts where counter flashing pulls out of mortar joints or where the cricket deteriorates. If your chimney sits on the downslope side of the roof without a cricket, water pools behind it during every rain. That’s a design problem, not just a maintenance issue.
Kickout Flashing
Kickout flashing is the one type that gets skipped most often, and its absence causes some of the worst hidden damage. It sits at the bottom of a roof-to-wall junction and redirects water into the gutter instead of letting it run down the siding. Without it, water infiltrates the wall cavity behind the siding for years before anyone notices. By that point, you’re looking at mold remediation and structural repairs.
Roof Flashing Materials
The material you choose affects longevity, cost, and compatibility with your roofing system. Here’s a breakdown of the most common types.
Aluminum is lightweight, easy to bend, and affordable. It works well in most climates but corrodes when it contacts concrete or morite-based masonry unless coated. It’s the most common choice for residential step flashing and drip edges. For coastal homes exposed to salt air, aluminum with a protective coating holds up better than bare galvanized steel.
Galvanized steel is more rigid and durable than aluminum, making it a solid choice for valleys and chimney crickets where structural strength matters. The zinc coating prevents rust, but once that coating wears through, corrosion accelerates quickly. Expect 15 to 25 years depending on your climate.
Copper lasts 50 years or more and develops a distinctive green patina. It’s the premium option, costing three to five times more than aluminum or galvanized steel. Copper is best suited for high-end homes or historic restorations where longevity justifies the investment. One caution: copper creates galvanic corrosion when it contacts dissimilar metals, so every fastener and adjacent piece needs to be compatible.
Signs of Flashing Failure
Flashing doesn’t usually fail all at once. It deteriorates gradually, and the signs often show up inside your home before they’re visible on the roof. Keep an eye out for these red flags:
- Water stains on ceilings or walls near chimneys, skylights, or where a roof meets a wall.
- Rust streaks or corrosion visible on metal flashing from the ground (binoculars help).
- Lifted or bent flashing edges after high winds.
- Cracked or missing sealant around flashing joints, especially at chimneys.
- Soft or spongy decking when walking near wall junctions (a sign of long-term moisture intrusion).
After any major storm, grab binoculars and scan your roofline from the ground. Photograph anything that looks lifted, separated, or discolored. That documentation helps your roofer pinpoint problems faster. Specific flashing details like sealed drip edges and fastened underlayment resist both uplift and water intrusion, and homes meeting those standards often qualify for insurance premium discounts.
Flashing Repair vs. Full Replacement
Minor issues, such as a small section of lifted step flashing or degraded sealant around a vent pipe, usually call for targeted repair. A roofer can reseal, refasten, or replace individual pieces without tearing into the surrounding shingles extensively.
Full replacement makes more sense when corrosion covers large sections, when the flashing material is incompatible with your current roof (common in re-roofing projects), or when chimney counter flashing has pulled free from crumbling mortar.
If your roof is nearing the end of its lifespan, replacing flashing separately is rarely cost-effective. It’s better to address flashing as part of a complete roof replacement when your shingles are due for renewal.
How Much Does Roof Flashing Repair and Replacement Cost
Costs vary significantly based on flashing type, material, roof pitch, and accessibility. Here’s a realistic range for common scenarios.
| Scope of Work | Estimated Cost Range | Key Cost Drivers |
|---|---|---|
| Reseal or refasten existing flashing | $100–$300 | Accessibility, number of locations |
| Replace pipe boot / vent flashing | $150–$400 | Material type, roof pitch |
| Replace step flashing along one wall | $300–$800 | Wall length, siding removal needed |
| Full chimney flashing replacement | $500–$1,500+ | Chimney size, cricket needed, masonry condition |
| Complete drip edge replacement | $400–$1,200 | Roof perimeter length, material choice |
| Copper flashing upgrade (chimney) | $1,500–$3,000+ | Copper material premium, custom fabrication |
Labor typically accounts for 60% to 70% of the total cost. Steep roofs, multi-story homes, and complex chimney geometries push costs toward the higher end. Always get at least two detailed written estimates, and make sure each quote specifies the material gauge and type being used. Make sure you choose a qualified roofing contractor to protect you from paying for substandard work that fails within a few years.
Roof Flashing Maintenance Checklist for Homeowners
You don’t need to climb on your roof to stay on top of flashing maintenance. Most of these checks happen from the ground or inside your attic.
- Twice per year (spring and fall): Use binoculars to scan chimney flashing, drip edges, and visible wall-to-roof junctions for rust, gaps, or lifted edges.
- After every major storm: Check attic spaces for fresh water stains, especially near chimneys and skylights.
- Every 3–5 years: Have a professional inspect flashing sealant condition, mortar joint integrity around counter flashing, and pipe boot rubber for cracking.
- During any re-roofing project: Replace all flashing. Reusing old flashing under new shingles is one of the most common cost-cutting shortcuts that leads to premature leaks.
Photograph your roof annually from multiple angles. Comparing year-over-year photos reveals gradual changes like spreading rust or shifting edges that are impossible to catch in a single inspection.
Protect Your Home by Staying Ahead of Flashing Failures
Roof flashing is one of those details that costs relatively little to maintain but can cause devastating damage when neglected. Most leaks homeowners attribute to “bad shingles” actually originate at a flashing failure point. Now that you know where to look and what to look for, you can catch problems while they’re still relatively inexpensive to fix.
If you’ve spotted any warning signs on your own roof, or if it’s been more than three years since a professional inspected your flashing, don’t wait for the next heavy rain to find out. Home Genius Exteriors offers free roof inspections and detailed estimates from experienced contractors who see these issues regularly. Call today for a free inspection and estimate so a small flashing issue doesn’t become a major structural problem.
Frequently Asked Questions
Can roof flashing be installed incorrectly even if it looks fine from the ground?
Yes. Some of the most common mistakes happen under shingles or behind siding, such as improper overlap, wrong fastener placement, or missing underlayment integration, and they may not be visible until a leak appears. A contractor can confirm installation quality by inspecting the most vulnerable transitions.
How do I know if a flashing leak is coming from the roof or from the wall or chimney itself?
Water can travel along framing and sheathing before it shows up indoors, so the visible stain isn’t always the source location. A professional will use attic tracing, moisture mapping, and selective shingle lifting to confirm whether the entry point is the flashing, masonry joints, siding, or a nearby penetration.
Will replacing gutters or adding gutter guards help prevent flashing problems?
Proper water management can reduce overflow and splashback that stress roof edges and wall intersections. Gutters that are correctly sized, pitched, and kept clear help move water away faster, which lowers the odds of chronic wetting around edge details.
What should I ask a roofer to include in a flashing quote so I can compare bids accurately?
Ask for the exact metal type, thickness (gauge), finish or coating, and whether pieces will be custom-bent on site or pre-formed. Also confirm what needs to be removed and reinstalled (siding, shingles, mortar work), how penetrations will be sealed, and what workmanship warranty applies to the flashing work specifically.
Are there code or manufacturer requirements that affect how flashing must be installed?
Yes. Local building codes and shingle manufacturers often specify how flashing integrates with underlayment, the minimum overlaps, and where ice and water barrier is required. If flashing doesn’t meet those requirements, you can risk failed inspections, voided material warranties, or repeat leaks.
Can I use roof cement or caulk as a permanent fix for flashing issues?
Sealants are best treated as short-term protection, not a permanent repair strategy, because movement and weathering can break the bond. If the metal is mis-lapped, punctured, or poorly integrated with surrounding materials, the durable fix is reworking or replacing the flashing detail, then using sealant only where appropriate.
Is it worth upgrading to custom flashing during a remodel like a new skylight or new siding?
Often, yes, because remodel work changes how water sheds at transitions and can expose older, marginal details. Upgrading flashing while the area is already opened up typically improves long-term reliability and can prevent having to disturb new finishes later.