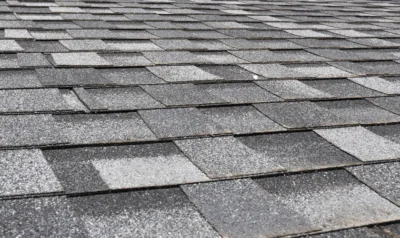
How to Replace Roof Shingles
Hoping to learn how to replace roof shingles yourself? It might save you some money on a minor repair, but it’s a job that demands careful preparation and serious attention to safety. Whether you’ve spotted a few cracked tabs after a storm or noticed a bare patch where wind peeled shingles away, a targeted fix can extend your roof’s lifespan and prevent water damage.
As roofing experts, we’ll show you how to do a small-scale shingle replacement with low-cost three-tab shingles (different from architectural shingles), with the caveat that in most situations it’s best to step off the ladder and call a professional.
Important Disclaimer: DIY Roof Repair Risks
Roof work is inherently dangerous. Falls from residential roofs account for thousands of emergency room visits each year. Improper repairs can also void manufacturer warranties or create hidden leak paths that cause far more damage than the original problem.
The information in this article is for educational purposes only. We strongly recommend hiring a licensed, experienced roofing professional for any repair, regardless of size.
Never work on a roof with a pitch steeper than 6:12 without professional fall-protection systems. Stop immediately if you encounter soft decking, widespread rot, or any structural damage, and always have a second person there to spot you.
Tools, Materials, and Safety Gear to Replace Roof Shingles
Before you climb up, gather everything you need on the ground first. A well-organized work area makes the job more efficient and reduces your time spent at a dangerous height.
You can often calculate your roof pitch from inside the attic if you have access.
Tools and Materials
- Flat pry bar (or roofing shingle remover): Slides under shingles to pop nails without tearing surrounding material.
- Hammer and roofing nails (1¼ inch galvanized): Galvanized nails resist rust and meet most building codes.
- Utility knife with extra blades: Cuts replacement shingles to size and trims old sealant.
- Roofing cement (tube or caulk-gun cartridge): Seals nail heads and bonds shingle tabs when it’s too cold for self-seal strips to activate.
- Replacement shingles: Always buy a few extras. Match the brand, product line, and color as closely as possible.
Safety Equipment
- Roofing harness and roof anchor: Should be used when working on any roof regardless of pitch.
- Rubber-soled shoes or roofing boots: Provide grip on granular shingle surfaces.
- Sturdy extension ladder with stabilizer: Set at a 75-degree angle with the top extending at least three feet above the eave.
- Safety glasses and work gloves: Protect against sharp nails, broken shingle edges, and debris.
Only 14% of homeowners complete roof repairs themselves, which means the vast majority wisely rely on professionals. If you’re among the minority attempting to DIY, you need to be extremely thorough with your safety prep.
Step-by-Step Guide to Replace Roof Shingles
These steps cover replacing one to five damaged or missing shingles. For anything more extensive, or if you discover underlying damage, stop work and contact a professional roofer.
The process is similar to the techniques used to repair a roof leak, though finding a leak often requires extra investigation from inside the attic.
Step 1: Break the Seal and Lift Surrounding Shingles
Each shingle row overlaps the one below it, bonded by a factory-applied adhesive strip. Slide your flat pry bar gently under the shingle above the damaged one, working slowly to break the seal without cracking the good shingle. In warm weather, the sealant should be pliable and separate easily (but in hot weather it may get sticky and hard to work with). In cold weather (below 40°F), shingles become brittle, so consider waiting for milder conditions.
Caution: Forcing a pry bar in freezing temperatures can crack multiple surrounding shingles. Don’t make the problem worse!
Step 2: Remove the Nails Holding the Damaged Shingle
A standard three-tab shingle is held by two rows of nails: four through its own nail line and four through the shingle above it. That means you’ll need to loosen or remove up to eight nails. Slide the pry bar under each nail head and lever it upward. Pull nails cleanly rather than ripping them through the shingle, which can tear the underlayment.
Step 3: Slide Out the Old Shingle and Inspect the Deck
Once you’ve removed the nails, the damaged shingle should slide out. Before inserting the replacement, inspect the exposed roof deck and underlayment for rot or moisture. If the wood feels soft when you press it, this is structural damage that needs professional attention. A cosmetic shingle replacement over bad decking only masks a problem that will get worse.
Step 4: Install the New Shingle
Slide the new shingle into position, aligning its lower edge with the shingles on either side. The nail line should sit directly over the nail line of the course below. Drive four roofing nails evenly across the nail line, keeping each nail about one inch from the shingle’s side edges.
Make sure you know the difference between three-tab and architectural shingles. Architectural shingles are thicker and require slightly different nail placement.
Step 5: Seal Nail Heads and Press Tabs Down
Apply a quarter-sized dab of roofing cement over each exposed nail head. Then press down the overlapping shingle tabs. If temperatures are too cool for the self-seal strip to bond naturally, apply a thin bead of cement along the adhesive strip. Avoid over-applying sealant, as excess cement can channel water instead of repelling it.
Matching New Shingles to Your Existing Roof
Color matching is one of the trickiest parts of a shingle replacement. UV exposure fades shingles over time, so the exact same product, when new, will look different on a 10-year-old roof. Start by checking your attic or garage for leftover shingles from the original installation.
If you don’t have extras, find the manufacturer and product name printed on the underside of an existing shingle or on your warranty paperwork. In many cases, a slight mismatch fades and blends within a season or two.
Keep in mind that some municipalities require permits even for minor roof work. Before starting, check local regulations. Skipping this step can create insurance and resale complications.
When to Call a Professional Roofer
Replacing your own roof shingles may be fine for isolated, minor damage on low-pitch roofs. However, many scenarios require professional expertise.
Call a licensed contractor if you find more than 5-10 damaged shingles or if the damage is near valleys and flashing. You should also stop immediately if the roof deck shows rot or if your roof pitch exceeds 6:12. Plus, performing your own work can void manufacturer warranties, which is a risk that often outweighs the cost savings of DIY.
Home Genius Exteriors specializes in roof repairs and full roof replacements backed by Platinum Warranties through our Owens Corning Platinum Preferred Contractor certification. Whether you’ve completed a small patch and want a professional roof inspection to prepare your roof for summer, or you’ve decided the job is bigger than expected, our experienced team handles everything. Get in touch today for a free inspection and estimate.
Frequently Asked Questions
How can I tell if the damage is limited to shingles, or if I have a ventilation or condensation issue?
Check your attic for widespread moisture, frosty nail heads in winter, or staining on the underside of the roof deck. If moisture appears across large areas instead of directly below the damaged spot, have a pro roofer evaluate your home’s airflow and insulation.
What should I do if I find rusted nails or nail pops while replacing a shingle?
Replace any rusted fasteners with new galvanized roofing nails and re-seat any lifted shingles so they sit flat. If nail pops are frequent in the area, it can point to installation or decking issues that a professional should assess.
Can I replace a shingle if there’s moss or algae on the roof nearby?
Yes, but clean the surrounding area gently first so the new shingle can seal properly. Avoid pressure washing, which can strip granules and shorten shingle life. Use a roof-safe cleaner and a low-pressure rinse instead.
How do I replace roof shingles around vents or skylights?
Areas around penetrations rely on flashing that must be layered correctly to shed water. If the shingle damage is next to a vent boot, skylight, or chimney, it’s better to hire a roofer. An incorrect flashing overlap can create leaks even if the shingle looks perfect.
How long should I wait before checking the repair for leaks, and what should I look for?
Inspect the area after the next heavy rain, and then recheck in a week to confirm the tabs are sealed. Inside, look for new water stains, damp insulation, or musty odors in the attic that could signal a slow leak.
Will a small shingle repair affect my homeowners insurance claim or future coverage?
It can, especially if the damage was storm-related. Take clear before-and-after photos and save your receipts for materials. You might also need a professional inspection report to prove the roof was restored properly.